 |
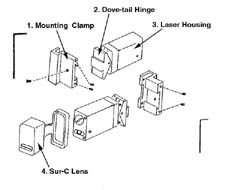
OVERALL
VIEW OF COMPONENTS |
| 1. Mounting Clamp with 4 screws
for secure mounting to metal or plastic pin guard. |
| 2. Dove-tail hinge for mounting
laser housing (3) to mounting clamp (1). |
| 3. Laser housing with 4 adjustment
screws for elevation and left and right adjustments. Also
houses 3 #393 batteries. |
| 4. Sur-C Lens creates a holograph
field from 10-50 yds. at night (with dot in center of field) so
you can see your target. |
|
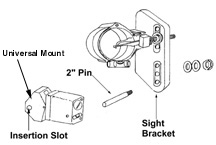 |
| UNIVERSAL STYLE MOUNTING
INSTRUCTIONS |
| 1. Slide 2" pin into 1/4"
hole of choice on sight bracket, or drill 1/4" hole of
choice. |
| 2. Secure with 1/4-20 washer
& nut |
| 3. Slide laser mount onto pin
to desired position. Preferably aligned with sight
pins (left and right). |
| 4. Tighten lock screw on 2"
pin to secure. |
| NOTE: KEEP WIRE OUT
OF ARROW PATH |
|
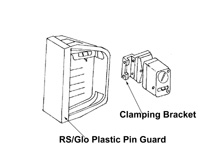 |
| CLAMP STYLE MOUNTING INSTRUCTIONS |
| 1. Attach laser clamping bracket
to pin guard. |
| 2. Position laser clamp on pin guard
to desired position. |
| 3. Tighten clamp screw to secure
to mount. |
| 4. Run switch wire in an out-of-the-way
path to riser of bow. |
| 5. Secure wire to front of riser
for index finger with the provided velcro. |
| NOTE: KEEP WIRE OUT OF ARROW
PATH |
|
 |
| BATTERY INSTALLATION INSTRUCTIONS |
| 1. Remove battery cap. |
| 2. Place batteries into receptacle
with negative (-) side inward & positive (+) outward |
| 3. Battery cap must contact the
positive (+) battery side. |
| 4. Keep battery cap face and screw
threads clean as they are parts of an electrical circuit. |
| 5. Handle battery cap & receptacle
carefully to avoid stripping or crossthreading. |
|
 |
|
PIN
GUARD HORIZONTAL MOUNTING |
| 1. Use rear adjusting screws,
above & below hinge screw to adjust windage. |
| 2. Use side adjusting screws
to adjust elevation. |
PIN
GUARD VERTICAL MOUNTING |
| 1. Use side adjusting screws
to adjust windage. |
| 2. Use rear adjust screws to
adjust elevation. |
| NOTE: USE CAUTION WHEN
SETTING ADJUSTMENTS |
|